Raspberry Pi3 + OpenCV = Beeldherkenning
OpenCV installeren
OpenCV installeren op de Pi is wel wat omslachtiger als we gewoon : je moet de brondbestanden importeren en dan moet OpenCV gecompileerd worden op de Pi. Ik heb de volgende site stap per stap gevolgd met goed resultaat :
Install opencv 3 python on your raspberry-pi
- Let op, het compileren kan enkele uren tijd in beslag nemen, je terminal sessie mag niet onderbroken worden tijdens de compilatie ! Als je dus met "putty" werkt, moet je een "timeout" vermijden. Ikzelf heb maar een scherm en toetsenbord aangesloten en rechtstreeks op de pi gewerkt.
- OpenCV en Python worden hier in een "virtuele omgeving" geinstalleerd. Dit betekent dat deze installatie los staat van de standaard installatie van Python. Ook alle libraries die je hier wil gebruiken moeten in deze omgeving geinstalleerd worden. Dit doe je niet met "apt get", maar met "pip" ! Eerst zorgen dat je in deze virtuele omgeving werkt, en daarna de nodige librarys installeren.
- De "virtuele omgeving" is niet direct zichtbaar in je file manager (vb via FTP), omdat deze files en directories "hidden" zijn op de sd kaart. Je kan deze echter zichtbaar maken via "Preferences", "Panels" en dan de optie "Show hidden files"
- Omschakelen naar de virtuele omgeving "cv" doe je normaal met : "workon cv". Als dit niet werkt (vanuit de GUI lx terminal lukte dit niet) kan je volgend comando gebruiken : source ~/.virtualenvs/cv/bin/activate. Aan de "prompt" is steeds te merken dat je in de virtuele omgeving werkt : vooraan komt deze dir dan tussen haakjes te staan. Vb virtuele omgeving = cv, dan moet je "prompt er zo uitzien :
(cv) pi@raspberrypi:
Mijn OpenCV programma
Ook hier heb ik als basis het programma van pyimage genomen : track object movement
Ik heb wel enkele wijzigingen aangebracht :
- Om makkelijk een object te kunnen selecteren kan je met de muis hierop klikken, de kleur van deze pixel wordt dan als referentie genomen. Hiermee worden dan de instelbare grenzen van "hue", "saturation" en "value" bepaald.
- De positie van het object moet uiteraard worden doorgegeven naar mijn robot. Hiervoor heb ik de seriele poort gekozen. Maar, bij de Pi3 is deze poort standaard naar de bluetooth adapter geleid ! Je moet dus eerst nog een configuratiefile wijzigen om de seriele poort terug op pin 14 en 15 van de GPIO te leiden ! In de file "boot/config.txt" moet je eenvoudigweg "enable uart=1" aanpassen (was enable uart=0).
- Het tweede probleem was het ontbreken van de "serial" library in de virtuele python omgeving. Dit kan ook eenvoudig opgelost worden : zorg dat je eerst in de virtuele omgeving werkt, en dan "python -m pip install pyserial" zorgt ervoor dat de lib geinstalleerd wordt.
- De frame rate wordt ook telkens berekend en weergegeven in de terminal.
De camera
Een gewone usb webcam volstaat hier. Ik had wel grote verschillen in framerate naargelang de usb camera : een erg goedkope webcam kwam niet verder dan 4 fps, mijn gitup action cam had ca 6 fps bij 640*480 resolutie, en zelfs 20 fps bij 320*240 resolutie ! De pi-camera zelf heb ik nog niet kunnen testen. De action-cam heeft een zeer grote openingshoek, je hebt dus een groot beeldveld.
Het resultaat
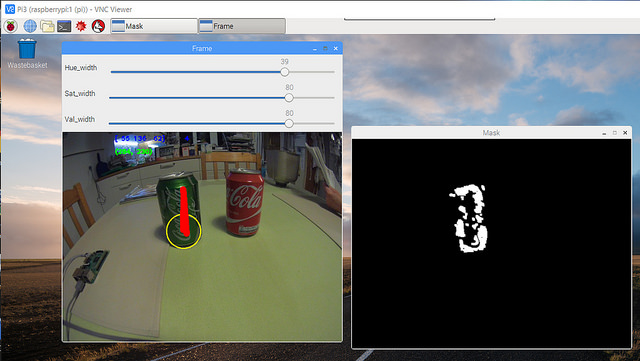
Je start het programma vanuit de terminal : python ball_3.py. Op dat moment moet er wel een "display" geopend zijn op de pi, en er moet een usb webcam aangesloten zijn. Er worden dan 2 schermen vertoond op het display, één met het webcam beeld en een met het resultaat van de kleurfilter. Bovenaan heb je ook 3 trackbars om de grootte van het filter in te stellen. Via de seriele poort wordt er bij elk frame steeds de positie van het grootste gevonden object in pixels doorgegeven. Je kiest een andere kleur door met de muis op de gewenste kleur / object te klikken.
Het python programma vind je hier :
 # in terminal, start vncserver first :
 # vncserver :1 -geometry 1920x1080
 # export DISPLAY=":1" for open window in  VNC !!!
 # to stop vncserver : vncserver -kill :1
 # to run without terrminal :
 # nohup python ball_3.py &
 # switch to virtual enviroment :
 # workon cv
 # indien workon = "not found" dan : source ~/.virtualenvs/cv/bin/activate

 # import the necessary packages

 import serial
 from collections import deque
 import numpy as np
 import argparse
 import imutils
 import cv2
 import time
 import pickle

 def nothing(x):
    pass
 GREEN=(0,255,0)
 BLUE=(255, 0, 0)
 font = cv2.FONT_HERSHEY_PLAIN

 # construct the argument parse and parse the arguments
 ap = argparse.ArgumentParser()
 ap.add_argument("-v", "--video", help="path to the (optional) video file")
 ap.add_argument("-b", "--buffer", type=int, default=64, help="max buffer size")
 ap.add_argument("-n", "--show", type=bool, default=0, help="no display")
 args = vars(ap.parse_args())

 fps = 0
 Lower = (0, 0, 0)
 Upper = (1, 100, 100)
 hue=0
 sat=0
 val=0
 cam_res_x=640
 cam_res_y=480
 def update(hue,sat,val,hue_width,sat_width,val_width):
    hue_l=hue-hue_width/2
    if(hue_l<=0):hue_l=0
    hue_h= hue_l+hue_width
    red = hue_h - 180
    if(red<0):red=0
    if(hue_h>=180): hue_h=180
    sat_l=sat-sat_width/2
    if(sat_l<=0):sat_l=0
    sat_h=sat_l+sat_width
    if(sat_h>=255):sat_h=255
    val_l=val-val_width/2
    if(val_l<=0):val_l=0
    val_h=val_l+val_width
    if(val_h>=255):val_h=255
    global Lower
    global Upper
    Lower = (hue_l, sat_l, val_l)
    Upper = (hue_h, sat_h, val_h)

 # Getting back the objects:
 with open('objs.pkl') as f:  # Python 3: open(..., 'rb')
    disk = pickle.load(f)
    hue=disk['Hue']
    sat=disk['Sat']
    val=disk['Val']
    hue_width=disk['W_hue']
    sat_width=disk['W_sat']
    val_width=disk['W_val']
    update(hue,sat,val,hue_width,sat_width,val_width)
    print disk
  colors = []

 def on_mouse_click (event, x, y, flags, param):
    if event == cv2.EVENT_LBUTTONUP:
        global colors
        global hue,sat,val
        del colors[:]
        #colors=[(y,x)]
        colors.append(frame[y,x].tolist())
        print colors
        color=([y,x])
        last = (len(colors) - 1)
        pixel=  cv2.cvtColor(np.uint8([colors]), cv2.COLOR_BGR2HSV)
        hue=(pixel[0,0,0])
        sat=(pixel[0,0,1])
        val=(pixel[0,0,2])
        update(hue,sat,val,hue_width,sat_width,val_width)
        disk= {'Hue':75, 'Sat':98, 'Val':80, 'W_hue':50,'W_sat':50,'W_val':50}
        disk['Hue'] = hue
        disk['Sat'] = sat
        disk['Val'] = val
        disk['W_hue'] = hue_width
        disk['W_sat'] = sat_width
        disk['W_val'] = val_width
        print disk
        # Saving the objects tot file:
        with open('objs.pkl', 'w') as f:  # Python 3: open(..., 'wb')
            pickle.dump(disk, f)

 pts = deque(maxlen=args["buffer"])

 # if a video path was not supplied, grab the reference
 # to the webcam
 if not args.get("video", False):
    camera = cv2.VideoCapture(0)

 # otherwise, grab a reference to the video file
 else:
    camera = cv2.VideoCapture(args["video"])
 # Reduce the size of video to 320x240 so rpi can process faster
 camera.set(3,cam_res_x)
 camera.set (4,cam_res_y)
 start = time.time()
 ser = serial.Serial('/dev/serial0', 38400, timeout=1)
 ser.write("testing")

 cv2.namedWindow('Mask')
 cv2.moveWindow('Mask',660,360)

 cv2.namedWindow('Frame')
 cv2.moveWindow('Frame',20,200)
 cv2.setMouseCallback('Frame', on_mouse_click)
  # callback if trackbar changes
  def on_trackbar_hue(hue_width):
    update(hue,sat,val,hue_width,sat_width,val_width)
 def on_trackbar_val(val_width):
    update(hue,sat,val,hue_width,sat_width,val_width)
 def on_trackbar_sat(sat_width):
    update(hue,sat,val,hue_width,sat_width,val_width)
 # create trackbars for color change
 cv2.createTrackbar('Hue_width','Frame',hue_width,50,on_trackbar_hue)
 cv2.createTrackbar('Sat_width','Frame',sat_width,100,on_trackbar_sat)
 cv2.createTrackbar('Val_width','Frame',val_width,100,on_trackbar_val)

 while (1):
 	# grab the current frame
 	(grabbed, frame) = camera.read()
        #frame = cv2.VideoCapture(0)
 	# if we are viewing a video and we did not grab a frame,
 	# then we have reached the end of the video
 	if args.get("video") and not grabbed:
 		break
        # get current positions of three trackbars
        hue_width = cv2.getTrackbarPos('Hue_width','Frame')
        sat_width = cv2.getTrackbarPos('Sat_width','Frame')
        val_width = cv2.getTrackbarPos('Val_width','Frame')

 	# resize the frame, blur it, and convert it to the HSV
 	# color space
 	# frame = imutils.resize(frame, width=300)
 	# blurred = cv2.GaussianBlur(frame, (11, 11), 0)
 	hsv = cv2.cvtColor(frame, cv2.COLOR_BGR2HSV)
 	if colors:
            cv2.putText(hsv, str(colors[-1]), (10, 50), cv2.FONT_HERSHEY_PLAIN, 2, (0, 0, 0), 2)
        #cv2.imshow('HSV-colors', hsv)

 	# construct a mask for the color between "Lower" and "Upper", then perform
 	# a series of  and erosions to remove any small
 	# blobs left in the mask
 	mask = cv2.inRange(hsv, Lower, Upper)
 	# mask2 = cv2.inRange(hsv, red_0, red_max)
 	# mask = mask1|mask2
 	mask = cv2.erode(mask, None, iterations=2)
 	mask = cv2.dilate(mask, None, iterations=2)
 	# find contours in the mask and initialize the current
 	# (x, y) center of the ball
 	cnts = cv2.findContours(mask.copy(), cv2.RETR_EXTERNAL,
 		cv2.CHAIN_APPROX_SIMPLE)[-2]
 	center = None

 	# only proceed if at least one contour was found
 	if len(cnts) > 0:
 		# find the largest contour in the mask, then use
 		# it to compute the minimum enclosing circle and
 		# centroid
 		c = max(cnts, key=cv2.contourArea)
 		((x, y), radius) = cv2.minEnclosingCircle(c)
 		M = cv2.moments(c)
 		center = (int(M["m10"] / M["m00"]), int(M["m01"] / M["m00"]))

 		# only proceed if the radius meets a minimum size
 		if radius > 10:
 			# draw the circle and centroid on the frame,
 			# then update the list of tracked points
 			cv2.circle(frame, (int(x), int(y)), int(radius),
 				(0,255,255), 2)
 			cv2.circle(frame, center, 5, (0,0,255), -1)
                        cv2.circle(frame, center, 5, (0, 0, 255), -1)
                        ser.write("blik_x="+str(int(x-cam_res_x/2))+"\r")
                        ser.write("blik_y="+str(int(y-cam_res_y/2))+"\r")
                        ser.write("blik="+str(int(radius))+"\r")
        else:
            ser.write("blik_x="+str(0)+"\r")
            ser.write("blik_y="+str(0)+"\r")

 	# update the points queue
 	pts.appendleft(center)

 	# loop over the set of tracked points
 	for i in xrange(1, len(pts)):
 		# if either of the tracked points are None, ignore them
 		if pts[i - 1] is None or pts[i] is None:
 			continue
 		# otherwise, compute the thickness of the line and
 		# draw the connecting lines
 		thickness = int(np.sqrt(args["buffer"] / float(i + 1)) * 2.5)
 		cv2.line(frame, pts[i - 1], pts[i], (0, 0, 255), thickness)
 		string= str(center).strip('[]')

        cv2.putText(frame,string,(120,50), font, 1,GREEN,2,cv2.LINE_AA)
        # convert 1D array to 3D, then convert it to HSV and take the first element
        # convert array to list, draw rectangle

        color = cv2.cvtColor( np.uint8([[Upper]] ), cv2.COLOR_HSV2BGR)[0][0]
        # show the mask with selected pixels
        cv2.imshow("Mask", mask)
        #frame = cv2.resize(frame, (640, 480)) # resize image
        if colors:
            hsv_pixel=  cv2.cvtColor(np.uint8([colors]) , cv2.COLOR_BGR2HSV)
            cv2.putText(frame, str(hsv_pixel[-1][-1]), (120, 20),font, 1,BLUE, 2)
            cv2.putText(frame, str(int(fps)), (280, 20),font, 1,BLUE, 2)
 	cv2.imshow('Frame', frame)

 	key = cv2.waitKey(1) & 0xFF

 	end=time.time()
 	seconds =  end - start
 	if(seconds>10):
            print "Time out..."
            break
 	start = end
 	fps = 1/seconds

        print "Estimated frames per seconds %8.0f"%fps
        #print(hue.get(), hue_width.get())

 	# if the 'q' key is pressed, stop the loop
 	if key == ord("q"):
 		break
  # cleanup the camera and close any open windows
 camera.release()
 cv2.destroyAllWindows()
